Pages

Showing posts with label makes. Show all posts

Saturday, 8 November 2014

Basket Case

The sudden drop in temperatures has really encouraged me to spend my evenings knitting instead of sewing, it must be some sort of craft-related hibernation preparation! I promised myself that I would reduce my over-sized yarn stash before I made any more expensive knitting project purchases, so I decided to knit up a blanket to snuggle up in in the evenings. It is a nice easy basket-weave design, so plenty of mindless TV knitting. I quite like the slightly random outcome of the stripes, using up all my chunky acrylic yarn.


Here is the pattern, free to you my good friends, hopefully it all makes sense! Modified from my brilliant 1981 Reader’s Digest ‘Complete Guide to Needlework’, which has the best stitch guides, and is delightfully retro ;). I decided to use stockinette and garter stitch, as although this means there is a back and a front to the blanket, the basket-weave lies flatter as the weaves are a bit looser.

I knitted with chunky/bulky yarn on 6.5 mm needles, the finished size is approx. 50 in x 42 in (127 cm x 106 cm). The final size could easily be modified by changing yarn, or adding in more sections. I used about 8 balls of acrylic yarn (mostly Hayfield bonus chunky 100g), which is roughly 1,200 yards (1,096 m).

k = knit stitch
p = purl stitch
RS - right side
WS - wrong side

Cast on 160 stitches (to make the blanket larger, increase cast on in multiples of 8)
Knit 15 rows of garter stitch (knit every row), ending on a RS row - Forms first border

To form basket-weave:
Section A (repeat for 16 rows):
WS - k8, *p8, k8, repeat from * to last 8 stitches, k8
RS - k to end
Section B (repeat for 16 rows):
WS - k8, *k8, p8, repeat from * to last 8 stitches, k8
RS - k to end

Alternate sections A and B until there are 16 sections in total (or desired size)
knit 15 rows of garter stitch - forms border. Cast off. All done!


Let me know if you give it a go, or if there are any horrible mistakes in the pattern!

Tuesday, 9 September 2014

Thirty-six Psychadelic Grannies

Well hello there. So, earlier this summer I made my lovely Mum a quilt for her birthday present, so here is the big reveal! This is the third quilt I've made; see the first here, and the second here. I decided to challenge myself a bit more with this one, so went with a granny square block design, using 2.5 inch squares. I added white borders between the squares, so the quilt fits a double bed and consists of 36 blocks, which is 900 squares in total, thank goodness for rotary cutters :)

There are many proper tutorials out there so I won't bore you with my ineptitude, but the basic idea is, cut out an awful lot of squares...

Arrange them into blocks according to taste, I tried not to be completely random in my arrangement, aiming for two dark and two light patterns in each block. I think choosing fabrics is my favourite part of the quilting process, so many choices! This one seems to have gone slightly psychadelic, I like to think that suits my Mum :)

Square up the blocks, then spend 3 hours trying every possible permutation of block arrangement... (or just be more decisive than me!)

Sew the quilt top together, lay out with quilt back and batting/wadding in a sandwich - I always get a cotton sheet for the backing as it is so much cheaper than buying fabric by the metre, and I don't need to piece it either.

Wrestle with so much fabric and try not to make too much of a mess of the quilting. I would love to try one of those machines that lets you make swirly interesting patterns.


Embroider a date patch, because obviously this will become a family heirloom...

Edge with pink elephants, and done!


Love you Mum!

What block design shall I challenge myself with next?

Wednesday, 6 August 2014

Accidental Stash

I appear to have accidentally accumulated a fabric stash! I started my sewing journey with good intentions - only purchase fabric for specific projects (I can see all you other sewists laughing now). Ha! That didn't last very long of course! Too many beautiful fabrics, and too little time. Plus half the fun of sewing is planning future makes. Now that I am finally moved in to my new house and have access to my machine again, I am plotting and planning. Here are a few pieces from my stash, and potential plans for them, any suggestions? I know I could use some more neutrals and plains, especially as the boyfriend is on my selfless sewing list!

Some curtain-weight fabrics, the flowery one of which I have previously used for an Elisalex, which I love. About a metre of each, I hope to use one or both to test the Kate and Laney Tap shorts pattern, view B with the big pleats for me!


Some fun lightweight jersey. Not really sure what to do with this one, only bought a metre for some reason, so maybe a Deer and Doe Plantain, or perhaps a Grainline Hemlock if I can squeeze it on. Thank you for all the free patterns you amazing people!


Some stripey linen that I have owned for way to long without doing anything with. Got three metres of this I think. I was originally going to use it to make another Grainline Archer, but I'm now thinking I might use it to make the Lilou dress in Tilly's lovely book, with the awesome pleated skirt! I haven't had much luck getting the Elisalex bodice to fit properly (see this fitting disaster area), so I'm thinking I might start afresh with a different pattern. I know it is just because I don't really know what I'm doing, but perhaps a change will help my patience!


Crazy African wax prints! Bought from Middlesex textiles which is really quite cheap, prices are for six metre lengths, and most prints are less than £20. Not 100% decided on what to do with these, I spilt with my recent sewing convert friend, so have 3m of each. Probably a dress from the horses and a gathered skirt from the crazy green. Maybe some fun PJ bottoms?

And a quick project to get the sewing muscle memory working again (curtains next!). My keychain lanyard broke, so after seeing this post on Made Peachy I thought I might as well make my own. I used ribbon and the hardware from the old, so it was a very cheap and easy job :)

What are your sewing plans? Autumn sewing already or well behind like me?!

Tuesday, 17 June 2014

Dots in the Sand

Well hello there! Slightly unplanned blog absence, but life decided to intervene and keep me very busy, including preparing for an unplanned house move. However, here I am checking in, and I'm off up north for two weeks from Monday, so I hope to get plenty of scenic pictures to bore you all with.

This post is, however, one of those with me filling every frame, although I've squeezed in some of the beautiful beach, just because.

I went to my cousin's lovely wedding this weekend (Congratulations if you're reading this!), and thought I would make use of the beautiful Anna Sui silk organza that I won through the Grainline Studio blog during the new Christine Haynes book blog tour, so thank you Jen and Christine for the fabulous fabric! I have never sewn with anything quite so precious (and slippery) so was worried I wouldn't be able to do it justice, but I hope it looks respectable ;)

The pattern is the ubiquitous ByHandLondon Elisalex, which I have now made a few times. I made a gathered skirt this time, so I could utilise the border print. I underlined the bodice and skirt with white taffeta, and also lined the bodice with white cotton. Underlining worked well to make the silk more stable, and helped me keep those pesky circles and dots reasonably straight!

Although it is wearable, I'm not that happy with the fit in the end. When I first inserted the zip the bodice was too tight, particularly around the waist, so I reinserted the zip using bias binding (slightly unorthodox?!) to give me a bit more space. However, this has now made the back gape and folds have appeared under the bust and on the back waist. I'm not really sure what I'm doing wrong with fitting, I've fiddled in various ways with this pattern each time I've made it but never seem to get it quite right. I guess I should probably go back to the start and make some test versions, or maybe I just need to do some more sit-ups?!

Anyway, to the pictures!


 This rolled hem foot is bloody marvellous and I suggest you all go out and buy one immediately :)

 Thank you Mr Greencoffeepot for your fabulous photography skills :)


Tuesday, 6 May 2014

Victory and the Hedgerow Dress

I finished my Sew For Victory dress in time! I posted a little while ago about my bodice muslin using the Colette Hawthorn pattern as a base, and my adventures in scallops, so here is the final product. I'm not sure the pattern of the fabric is very 1940s, but I couldn't resist it! The scallops do get a little lost, but I know they are there and I am quite pleased with the outcome. I ended up doing split tulip sleeves using the tutorial in Gertie's 'New Book for Better Sewing'.They came out well and it makes the dress much more summery; I think I'll be wearing it a lot! I'm also happy with the raised neckline and the length of the skirt. It was really fun to play around with a pattern and see what I could come up with, and I really enjoyed looking at patterns and photos from the 1940s for inspiration, although I am probably drawn more to 50s and early 60s silhouettes. Right, more poses for you!


Pockets of course!
I really tried to make an effort at finishing the insides properly. Side seams are french seamed, I bound the waist and armhole seams, and used pinking shears to trim the facings.


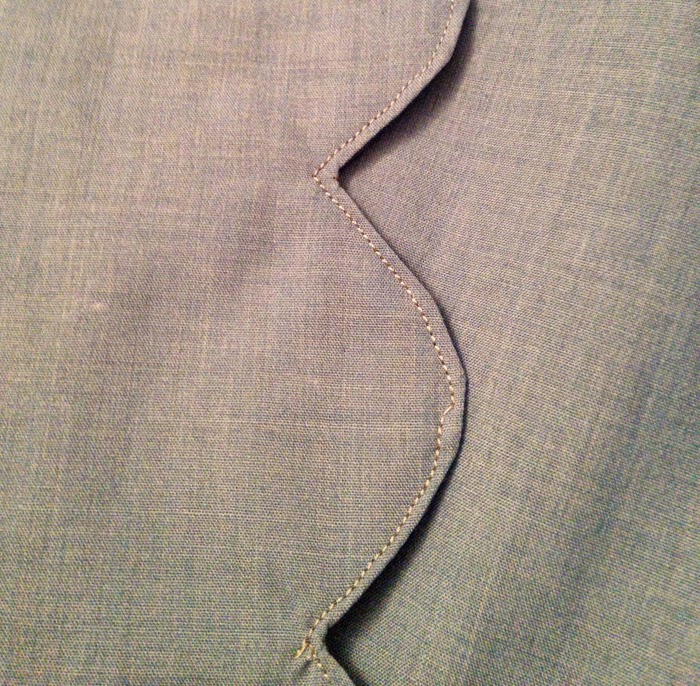
To do the scallops, I drew out a template after testing spacing and size on my muslin. I then used carbon paper to trace sew lines onto the facings, so it was nice and easy to stitch up. I clipped the curves well then went for topstitching to make it all behave! There are two scallops on the skirt front, then I stitched up the rest of the front. Someone post a pic of a vintage pattern on the flickr group that used scallops in the same way, so I stole that idea!

So overall, as I'm sure you can gather, I am pretty pleased with my first sew for victory make! I think I'll try and make something a bit more authentic next year ;)

Thanks Baoxiu for the posing photos!


Wednesday, 30 April 2014

Me-Made-May!

I've decided to join in the fun with Zoe this year! My home made wardrobe isn't that extensive, but  I do wear everything that I've made quite a lot, so I hope I will manage to achieve my pledge. I won't be posting daily photos as I haven't yet come up with a good strategy for photographing outfits, but I will try and put some summary posts together.


'I, Julia, sign up as a participant of Me-Made-May '14. I endeavour to wear at least one me-made garment each day for the duration of May 2014. I will also try to end the month with no UFOs.'

I also hope to go for quality not quantity for my sewing for May, by making some really well finished garments: A Grainline Archer with the lovely striped linen that has been in my stash for months, and a fabulous dress to wear to my cousin's wedding in June.


Monday, 28 April 2014

An Epic Yarn

More fantastic hilltop poses for you today! I started knitting this cardigan many moons ago (it featured in my 30 days of photos series in Nov 2012), but I finally finished it at the start of this year. I clearly work at a snail's pace in everything I do as I am only just blogging about it now! This is the first proper cabling I have attempted, but once I had learnt the pattern it was an easy knit, and I think worth the wait, although perhaps I should have tried to finish it for the start of winter, it is lovely and warm. The pattern is by Rowan, called Benbecula, and I used a pure British wool aran made by Jarol, I'd never seen it before until I picked it off the shelf in the Wool shop in Bath, but it is nice real wool that you can still smell the lanolin on, mmmm Sheepy! Anyway, to the poses...


Hopefully there are no mistakes in this bit!


Wednesday, 2 April 2014

Sew for Victory - Scallops Galore

Firstly, apologies in advance for the bad photos, especially anyone who is here for pretty scenic views, you might just want to ignore this post ;)

So I thought I would have a stab at Rochelle's Sew for Victory challenge this year. I love historic fashion, and the 1940s has some particularly appealing shapes. I'm attempting to recreate a scallop fronted dress seen in one of the free downloads Rochelle has released (the green dress on page 5 if you have it). I'm using the Colette Hawthorn pattern, which I have sewn before (pic here), and getting creative with the modifications.

This is a first attempt at a muslin of the bodice. I've altered the neckline, added a scallop detail to the button band, and changed the shape of the sleeve and the cuff design. This is all a bit new to me and I have been making it up as I go along, so any advice would be greatly appreciated!

Here is a (bad) photo of the full view, on:
I am quite pleased with the neckline alteration. There are bust dart issues, which seems to be a usual problem for me. They are always too pointy! I think the scallops are working quite well, but I am very much open to suggestions! The original dress only had 3 scallops between the waist and the bottom of the neck opening, so maybe I should make them bigger? I'll make the two sides of the neckline mirror each other, I was just experimenting with the scallop shape.

The scallops are a little messy, but I think that would be improved by more careful sewing, and better fabric.


I used facing and topstitching on the scallops, is this a good technique or is there something better? it was hard to get the points between them neat. Anyone know if topstitching was used in the 40s?

I also used a facing for the cuff, but I'm really not sure this is the best way, as it wants to turn in the wrong way as soon as I put my arm in the sleeve. The point is even sharper than on the button band scallops, so it is even messier!


So, sewing gurus, advice and feedback would be fabulous! I still need to pick out a fabric to make up the final version, I'm not sure whether to go for a plain or floral, decisions decisions...


Sunday, 16 March 2014

Bows and Arrows

At the start of this year I gave the Grainline Archer shirt pattern a go. I know I should probably try and build my skills with more simple projects, but the fabulous sew-along and the rave reviews made me want to give it a go. I figure (possibly arrogantly!) I can achieve anything if there are good instructions and I take it slow. This is only wearable muslin status really, but I am quite pleased with how it turned out; I think the main issue is I used a pretty cheap polycotton so there are some frayed edges and it doesn't feel too nice to wear. I'll definitely be making another version in better fabric, and with shorter sleeves, it appears I have short arms!

Prepare now for some silly photos :)

Selfie, like all the cool kids


Not quite sure about my rear view, trying to show the very long sleeves!

 And some construction pics, I am excessively pleased with some of the neat top stitching I achieved!


 Hope you are having a lovely sunny weekend, it is beautiful here in Dorset :)


Thursday, 9 January 2014

The Moronic Cushions

Hope everyone had a good new year! I just wanted to tell you about a Christmas present project that rescued my ego, after I had a moment of idiocy when making the wedding quilt! I managed to cut the strips for the star at the wrong angle, so the every single one was the wrong size and shape! Luckily I just had enough fabric to redo the quilt, but it left me with a big pile of misshapen strips. I didn't want to waste the lovely expensive quilting cotton, so I sewed the strips together and hey presto, made some cushion covers!

I added some extra fabric to the edges of the diamond strips, then quilted as normal. I then used the quilted square for the front of the cushions, with a simple overlapped back out of some striped stash fabric. I think they came out pretty well, out of disaster can come success :)